Different types of piercings will require slightly different aftercare routines, so the information on these pages is highly generalised.
Some piercings will require more in depth instructions, but I will personalise your aftercare speech at your appointment, depending on your piercing’s placement, your anatomy, lifestyle and jewellery choice.
Depending on the type of piercing, healing times can vary significantly from person to person and can be influenced by a wide range of factors such as placement, jewellery, movement and your overall health – for example if you have a weak immune system because of an underlying health condition, it’s likely your piercing might take longer to heal than usually expected and some conditions like diabetes effect this too.
If you feel like your piercing isn’t healing appropriately or you encounter any issues, please don’t Google or self-diagnose – you can email me on etherealaesthetics@outlook.com, or book yourself in for a troubleshooting session via my Services.
A piercing is considered an open wound and because of the presence of jewellery, it needs a hand getting rid of the “crusties” and other potential irritants from the entry/exit site that can build up around and underneath your exposed jewellery.
While the majority of these will drop off naturally in their own time, there are things you can do to help things along gently.
Cleaning Your Piercing
1. Check It
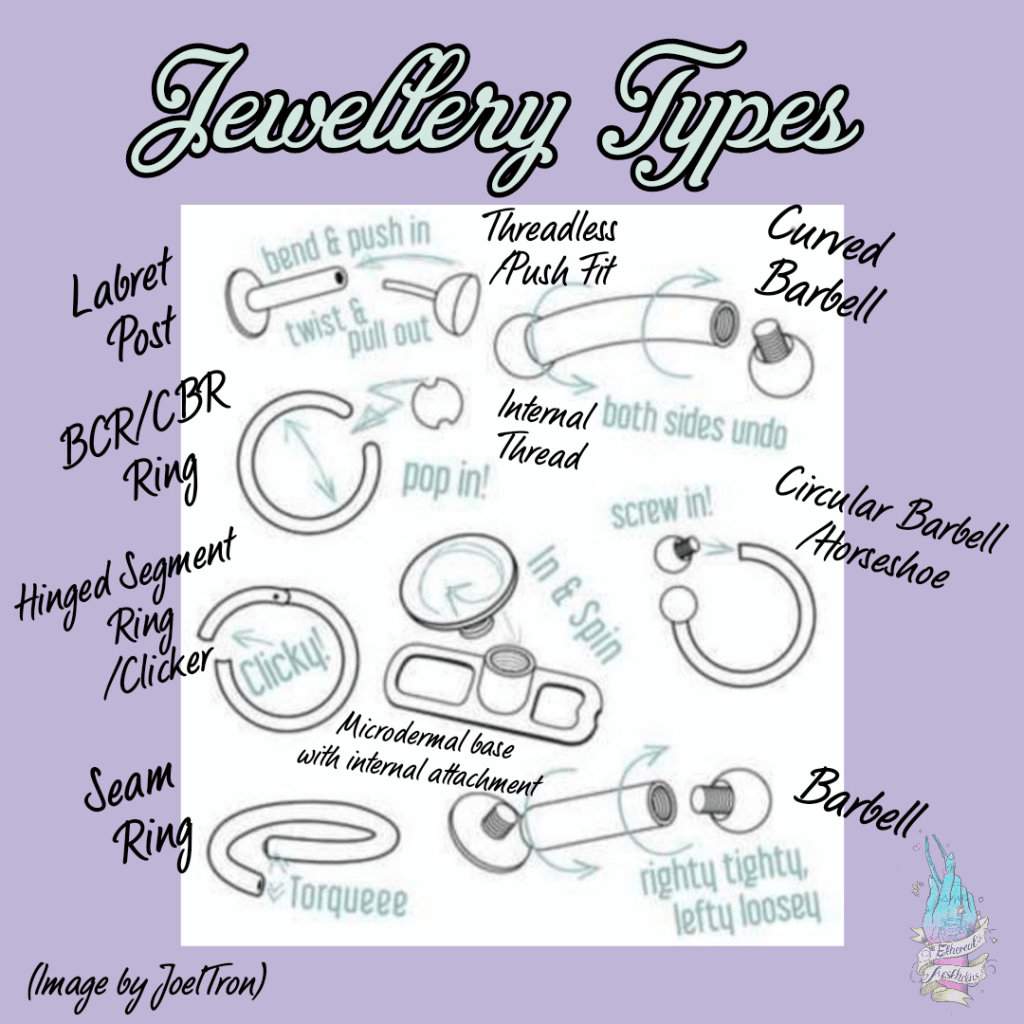
Visually check your attachment(s) to ensure they’re still secure and tighten/adjust accordingly (see the image at the end of this section for information on how your jewellery works!)
Try and get in the habit of doing this before showering, in case your attachment is loose!
2. Rinse It
Clean your piercing with sterile saline solution such as Neilmed or Stericlens spritzed front and back, then left to sit for a couple of minutes.
Or
Rinsing your piercing under the shower at the end of a showe, followed by the steps.
Up to twice daily (never any more!)
3. Wipe It
Gently wipe around your jewellery front and back, without moving /pushing forward or removing the jewellery, to remove any crusties that are ready to come away – if anything is being stubborn, just leave it there!
Use either clean kitchen roll or fresh sterile gauze.
4. Dry It
Gently pat or squeeze the area dry with a fresh piece of clean kitchen roll or sterile gauze, to ensure any moisture isn’t left on the skin as this can cause irritation!
Or
Blast the area front and back/top and bottom using a hairdyer on a cool setting
Or do both to be extra thorough!
5. Forget About It!
Your body is perfectly capable of healing a piercing as long as jewellery movement is kept to a minimum, external irritants are kept away from the area and you follow your recommended aftercare!
Unfortunately there are no magic lotions which can help your piercing to heal faster, but generally speaking a healthy body should be able to heal a piercing unaided.
Remember to always wash your hands before touching your piercing – dirty fingers/mouths can
cause infection & don’t fiddle!
What to Expect
- The piercing site will be sore, swollen, pussy/crusty for at least the first portion of your healing process, but this can be intermittent over the entire healing period too – swelling can present anywhere from a few seconds to a few weeks after the procedure, then subsides slowly over the course of a few weeks.
- Occasional bleeding and secretion of a sticky clear/white/pale yellow fluid (lymph) is completely normal throughout the healing process – this is usually mistaken for infection when combined with localised soreness of the area, but is nothing to worry about!
- The lymph/pus will form a crust once dried and shouldn’t be immediately picked off as it is protecting the healing wound – this is why it’s recommended to use sterile saline or shower soaks, to soften these up first.
- Bleeding if knocked/snagged is totally normal and also common over the healing process, especially in early days whilst there are no scabs to plug the wound.
- Be sure to get in touch if your jewellery starts to feel tight/uncomfortable, or looks like it’s sinking into your skin as it could benefit from an upsize!
What to Avoid
- Using home-made salt solutions, antiseptics, creams, oils (such as tea-tree), aspirin paste, contact lens solution or re-sealable aftercare solutions to clean or attempt to treat an irritated piercing – please get in touch if you’re experiencing any issues so I can help to find the source of the issue and prevent it from happening in the future!
- Using cotton wool/cotton wool buds, toilet tissue, towels, clothing or anything fibrous to clean or dry your piercing.
- Removing, moving or twisting your jewellery during the healing process or leaving it out for long periods before the piercing is 12 months old.
- Changing your jewellery yourself before 12 weeks.
- External thread jewellery, or jewellery made from non verified materials such as surgical/stainless steel, sterling silver, brass, PTFE/plastic, PVD/coated jewellery and butterfly back style jewellery unless branded and supplied by a reputable piercer.
- Letting anyone (including pets) lick or put your healing piercing in their mouth
Don’t
- Sleep on/wear tight fitted clothes over your piercing until it’s fully healed – a doughnut cushion/travel pillow is fab for ear piercings and a hard, vented eye patch can be useful for healing navel piercings, especially if you exercise regularly!
- Submerge your healing piercing in swimming pools, the bathtub, rivers, the sea etc until at least 6 weeks into healing.
- Use harsh soaps/cosmetics on or near your piercing until it’s fully healed and always remember to rinse it thoroughly after showering to remove any soap/shampoo residues!
- PICK! – this can tear your piercing, adding to your swelling and extending your healing time!
- If a piece of crusting is being particularly stubborn, leave it be and I can safely remove it for you at one of your check up appointments!
- Twist, turn or remove your jewellery – your body needs to be able to heal around your jewellery undisturbed!
Do
- Keep bedding/clothes clean and beware of letting pets sleep in your bed whilst you’re healing – hairs can find their way into piercing channels and can be super irritating!
- Avoid headphone buds for piercings like Tragus, Daith and Conch and over ear headphones for piercings like Helix, Flat and Industrial.
- Avoid lacey/push up bras for healing nipple piercings.
- Save hats for when your ear piercings are fully healed/downsized.
- Burn that loofah!
- Stay hydrated and look after yourself!
- Keep in touch! Get in contact if you’re experiencing any issues and make sure to attend your check up so your jewellery can be downsized appropriately!
Facial Piercings
- Clean Lip/Nostril piercings from the outside only using the recommended methods – a rinse under the shower works best for Septum piercings!
- Avoid smoking, spicy/salty/citrus foods and alcohol if healing an oral piercing, be sure to rinse with bottled water after eating/drinking for at least the first six weeks.
- Take care when eating and brushing your teeth and switch to non-whitening oral products.
- Avoid kissing/intimate contact for at least the first four to six weeks.
- Downsize your jewellery when recommended to minimise snagging, tooth damage and gum erosion.
How Your Jewellery Works
Downsizing Explained

- If pierced with a post, your initial jewellery will have been sized to your anatomy with added length to allow for expected swelling and drainage during the healing process.
- Once the swelling has subsided, the extra length on the post makes it easier for the jewellery to move around or to snag, which can lead to exacerbated swelling, irritation or a lost attachment.
- Piercings (especially cartilage) are also susceptible to migration (going wonky) if regularly caught or slept on, and if left to migrate enough can lead to unsightly scarring, your piercing potentially never healing/having to be removed, or rejection; but the majority of piercings will benefit from at least one downsize during it’s healing period.
- Wearing well fitted, high quality jewellery through your healing process can help to keep healing times to a minimum and to help prevent migration, random flare ups and rejection!
- I will have advised a rough recommended downsize date and booked a follow up at your appointment, but this can be pushed back or brought forward if needs be, or if you’re unsure just attend your check up as normal and I’ll be able to advise!
- Some piercings may require multiple downsize or upsizes before they are fully healed, depending on how fast you naturally heal or if the piercing suffers from any trauma (i.e a good knock and requires a longer post.)
- Piercings that have rings/circular barbells as starter jewellery (Daith & Septum) don’t necessarily require a downsize, but as the starter jewellery needs to be a certain gauge/diameter the majority of people choose to downsize – this can usually be done around two to three months.
- I recommend waiting a minimum of nine months to a year for Nostril and Cartilage piercings and three to four months for Earlobe/Septum, to ensure your piercing is fully healed and to avoid irritation and knocking your healing process back months.
After Your Check Up
Just because your piercing is downsized or healed, it doesn’t mean your job is over!
Piercings are only part way through their healing process at their downsize and there is every chance they could require further upsize or downsizes before fully healed. They could be sore, swollen, pussy/crusty anywhere over this process and I’ll have advised a rough healing time prior to booking you in, but bear in mind these are only rough estimates based off experience with past clients and this can differ from person to person.
I recommend to rinse your piercing with sterile saline solution such as Neilmed, or in the shower at least once daily whilst the piercing is fresh, but up to twice a day if required and to dry thoroughly afterwards with a hairdryer on the coolest setting.
You can decrease the number of cleans per day once further into the healing process, but I would always recommend a rinse and dry with fresh water/sterile saline any time the piercing could have come into contact with irritants such as soaps or shampoos. You should also avoid submerging your piercing in any body of water (swimming pool, bath tub, the sea etc) until at least six weeks into healing.
If piercings are no longer sore, it doesn’t necessarily mean they’re safe to be slept on/have tight fitted jewellery rubbing on them too!
I would always advise avoiding sleeping on ear piercings no matter how old they are (especially if you like to wear larger pieces or chains/charms) if it can be helped to avoid random flare-ups and potential embedded jewellery.
I always sleep with my doughnut pillow for damage limitation, ask about getting one when you’re in the studio – they’re a game changer!
It is also important to continue to care for your piercings once they’re fully healed too – this applies to all piercings, including those in your first lobes and areas like the navel and nipples, as residue build up over time can cause irritation.
All piercings collect a build up over time – this is a mixture of shed skin cells, oils, sweat, cosmetic residues and in some cases make up. This build up is not ideal for maintaining a healthy piercing and looks unsightly too!
Sometimes rinsing in the shower isn’t enough to help shift stubborn build up, so a fragrance free soap can be gently massaged into the jewellery and piercing and then rinsed off with fresh water.
I also recommend the use of soft bristled baby toothbrushes to help gently remove this build up, especially from pronged settings and they’re also great for exfoliating areas around your jewellery too! Polishing cloths are also great at keeping gold and titanium buffer and mirror polished, but be sure to rinse your jewellery and to rinse your piercing with saline and dry the area if you’ve removed the jewellery for a healed piercing! (Avoid removing the jewellery in a healing piercing at all!)
I have a Luxury Aftercare and Jewellery Care Pack available to purchase at the studio, or these can be posted out for P&P costs and you’ll also be offered the chance to upgrade at your appointment!
Neilmed, Polishing Cloths and brushes are also available to purchase separately.
Clients with larger jewellery collections might want to look into purchasing a personal ultrasonic cleaner to keep their pieces looking fabulous!
This is also why it’s important to stick to verified implant grade materials or solid 14/18k gold jewellery – these have been tested and proven safe for long term wear in piercings and won’t begin to break down. Uneven surface finish, plating flaking off and non verified materials such as sterling silver and surgical steel can cause irritation, allergic reactions and in some cases infection. This results in jewellery tarnishing/rusting which can stain your skin in some cases and looks awful!
Mirror polish finish jewellery is less likely to collect a large volume of build up and is generally easier to maintain, whereas jewellery with a rough surface finish is much more likely to cause irritation over time and therefore cause more reason for buildup. The rough surface finish also gives the build up more nooks and crannies to hide in.
Generally speaking, the stones in lower quality jewellery will not be genuine meaning a chance of discolouration, water damage or lost stones, meaning you have to purchase a whole new piece.
I’m always happy to help source custom pieces if you’ve got something specific in mind – get in touch for more information on custom orders, or head to my booking in page for a link to my Setmore and book for a jewellery consultation!
All premium manufacturers stocked at Ethereal Aesthetics offer a lifetime guarantee against defects, covering lost stones and defective pins/threads, giving you that extra peace of mind and comfort knowing your jewellery was built to be worn every day!
(Please note this does not cover accidental loss of a piece after the first 48 hours or accidental damage.)
You’ve invested in fabulous quality jewellery, so invest a little of your time to keep it looking fabulous!
Be sure to get in touch at etherealaesthetics@outlook.com if you have any questions or are experiencing any issues healing your piercing, even if it wasn’t pierced by myself!
